Sealing Mylar bags is an essential skill for anyone involved in long-term storage, whether for food preservation, emergency preparedness, or protecting sensitive materials. Mylar bags, with their metallic sheen and durable structure, are excellent at keeping out air, moisture, and light—three elements that can degrade the quality and shelf life of stored items. We will walk you through the step-by-step process to seal Mylar bags effectively, ensuring that your items remain safe and fresh for extended periods.
1. Understanding Mylar Bags and Their Uses
Mylar bags are made from a polyester film known for its strength and resistance to moisture, air, and light. These bags are commonly used in food storage, emergency preparedness, and protecting valuables. Due to their non-permeable nature, they can create a secure environment for long-term storage. However, sealing them properly is key to ensuring that these bags fulfill their purpose.
Whether you’re storing dry foods, important documents, or electronic equipment, sealing your Mylar bag effectively is crucial to maintaining the integrity of the contents inside. The right sealing technique will prevent spoilage, degradation, and contamination, extending the lifespan of your stored goods.
2. What You Need to Seal Mylar Bags: Tools and Materials
Before you begin the sealing process, make sure you have the following tools and materials on hand:
- Mylar Bags: Choose the appropriate size based on your storage needs. Mylar bags come in various sizes, from small ones for individual portions to large ones for bulk storage.
- Heat Sealer or Iron: A heat sealer is the best tool for sealing Mylar bags, as it creates a strong, consistent seal. If you don’t have a heat sealer, an iron can serve as an alternative.
- Oxygen Absorbers (Optional): These small packets absorb the oxygen inside the bag, further enhancing the preservation process, especially for food items.
- Food or Items to Store: The contents of the bag should be prepared and ready for storage. For food, ensure it’s dry and free of moisture before sealing.
- Scissors: If needed, to cut the Mylar bag to the desired size before sealing.
3. Preparing the Mylar Bag: Steps Before Sealing
Before you begin sealing, take a few moments to prepare your Mylar bag and contents:
- Inspect the Mylar Bag: Make sure the bag is free from any tears or holes. A damaged bag will not provide an effective seal, and air or moisture could leak in.
- Clean the Bag: Ensure the inside of the bag is free from dust or debris. Any contaminants inside the bag can interfere with the sealing process and may lead to compromised storage conditions.
- Prepare the Contents: If you’re storing food, ensure it’s dry and free from excess moisture. Moisture inside the bag can lead to mold growth, spoilage, or other issues. For non-food items, simply ensure they are ready to be sealed.
4. Step-by-Step Process for Sealing Mylar Bags
Now that everything is prepared, let’s walk through the sealing process:
Step 1: Fill the Mylar Bag
Start by placing your items into the Mylar bag. When storing food, leave about 2-3 inches of space at the top of the bag to allow room for sealing. For non-food items, ensure there is enough space for proper sealing but avoid overfilling, as this can cause the bag to break or lead to an uneven seal.
Step 2: Remove the Air
It’s essential to remove as much air from the bag as possible before sealing. Air inside the bag can contribute to oxidation, which can spoil food or damage other items. To do this, gently press the air out of the bag by hand or use an oxygen absorber if sealing food. For food storage, an oxygen absorber is highly recommended, as it will help to eliminate any remaining oxygen and ensure long-term preservation.
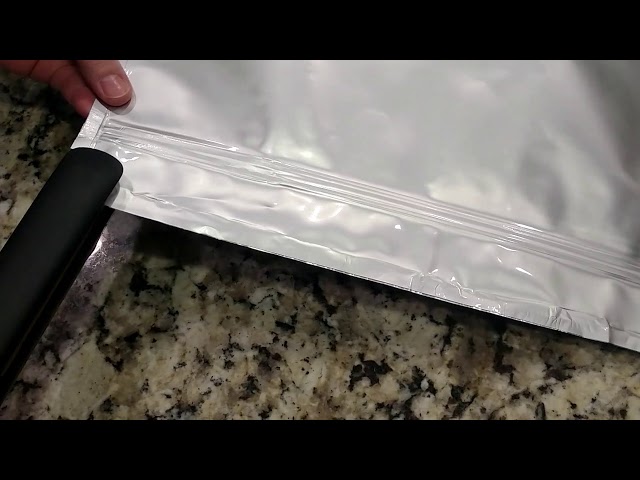
Step 3: Heat Sealing the Mylar Bag
Once the bag is filled and the air is removed, it’s time to seal it. If you’re using a heat sealer, place the open end of the bag inside the machine and press down to create a tight seal. Most heat sealers will have adjustable settings for temperature, so make sure to adjust it to the correct heat level based on the thickness of your Mylar bag.
If you don’t have a heat sealer, you can use an iron as a substitute. Set the iron to a medium-high heat setting (no steam) and press it over the open end of the bag for 8-10 seconds. Be sure to apply even pressure across the entire width of the bag. After sealing, let the bag cool for a few seconds before handling.
Step 4: Check the Seal
After sealing, check the integrity of the seal by gently pressing around the edges of the bag. The seal should be strong, with no visible gaps or weak spots. If you find any issues, re-seal the bag by going over the edges again. This ensures that the seal is air-tight and moisture-proof.
5. Troubleshooting: Common Issues and How to Fix Them
Even with the best preparation, sometimes issues can arise during the sealing process. Here are some common problems and how to solve them:
- Weak Seal: If the seal isn’t holding, it might be because the heat setting was too low or the bag wasn’t pressed evenly. Try increasing the heat slightly or applying more pressure while sealing.
- Air Bubbles or Gaps: If you see air bubbles or gaps in the seal, it could be due to moisture in the bag or an uneven sealing process. Make sure the bag is completely dry and re-seal it with even pressure.
- Tears or Holes: Always inspect the Mylar bag for any visible damage before sealing. If a tear or hole occurs after sealing, you may need to use a new bag or re-seal the damaged area with a second sealing line.
6. Best Practices for Long-Term Storage with Sealed Mylar Bags
Sealing Mylar bags is an effective way to protect your items from the elements and ensure long-term storage. To maintain the integrity of your sealed bags, follow these best practices:
- Store in a Cool, Dry Place: After sealing, place your Mylar bags in a cool, dry area away from direct sunlight or extreme temperatures. Excessive heat or humidity can compromise the bag’s effectiveness.
- Label Your Bags: Don’t forget to label each bag with the contents and the date of sealing. This will help you keep track of what’s inside and monitor the shelf life.
- Regularly Inspect Your Seals: While Mylar bags can last a long time, it’s a good idea to check your sealed bags every few months to ensure that they remain intact and haven’t been compromised.
By following these simple steps, you can effectively seal Mylar bags and protect your valuable items for years to come. Whether you’re storing food for an emergency or preserving important documents, the proper sealing technique is key to successful long-term storage.