Mylar bags are a go-to solution for long-term food storage, emergency preparedness, and protecting sensitive items from moisture, oxygen, and light. But one of the most common questions people ask is: how to seal a mylar bag properly? If you’re new to food preservation or prepping, the idea of sealing a metallic-looking bag might sound intimidating—but it’s actually quite simple once you understand the process.
We’ll walk through how to seal mylar bag step by step, explain the tools you need, and offer practical tips for success. Whether you’re using these bags for storing rice, beans, or even dehydrated meals, sealing them correctly is the key to long-lasting protection.
Why Mylar Bags?
Before we jump into the process, it’s worth understanding why Mylar bags are so effective. Mylar (a brand name for biaxially oriented polyethylene terephthalate or BoPET) is a strong, reflective material that offers excellent barrier protection. When sealed properly, Mylar bags keep oxygen, moisture, and light out—three major enemies of food shelf life.
Whether you’re preparing for an emergency or simply bulk-storing pantry staples, Mylar bags combined with oxygen absorbers can keep food safe for 5, 10, or even 25 years.
How Do You Seal a Mylar Bag?
That’s the big question: how do you seal a mylar bag so that it maintains an airtight and moisture-free environment? Let’s break down the process step by step.
Step 1: Gather Your Materials
To seal your Mylar bags, you’ll need the following:
- Mylar Bags – Choose the size that fits your needs. Common sizes include 1-gallon and 5-gallon bags.
- Oxygen Absorbers – These help eliminate residual oxygen inside the bag.
- Heat Source – Either a heat sealer (recommended) or a household iron.
- Flat Surface – A wooden cutting board or countertop works well.
- Marker – To label contents and date for tracking.
Step 2: Fill the Bag
Place the food or items inside the Mylar bag. If you’re storing dry goods like grains, legumes, or powdered foods, be sure they are completely dry. Avoid overfilling—leave about 2–3 inches of space at the top to allow for sealing.
Step 3: Add Oxygen Absorbers
Drop the correct number of oxygen absorbers into the bag. The amount depends on the bag size and the type of food you’re storing. For example, a 1-gallon bag of dry goods typically requires a 300cc to 500cc absorber.
Once you expose the absorbers to air, you should seal the bags within 10–15 minutes for best results.
Step 4: Remove Excess Air
Before sealing, press as much air out of the bag as you can by hand. This doesn’t replace the job of oxygen absorbers, but it helps create a better seal and reduces internal pressure.
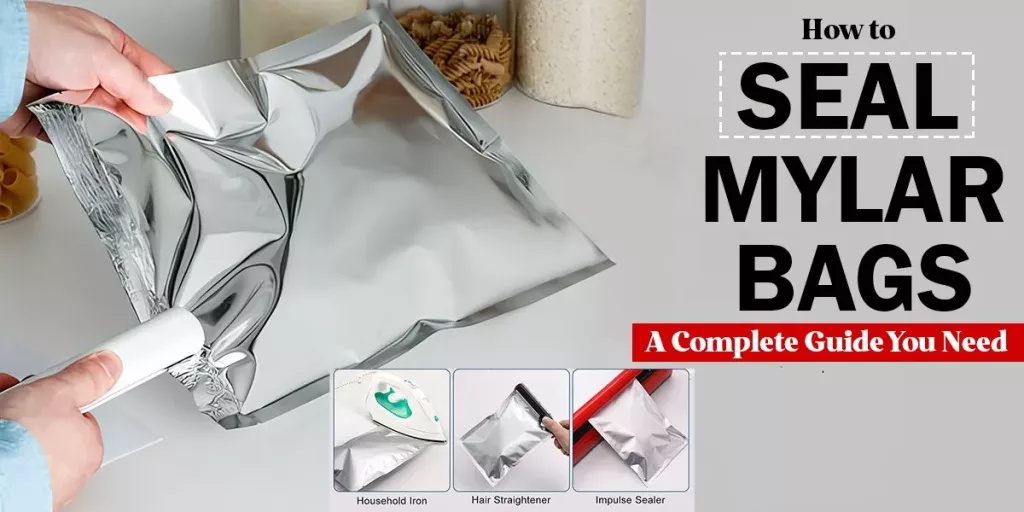
Step 5: Seal the Mylar Bag
Now comes the important part—how to seal mylar bag using heat. You have two options:
Option A: Use a Heat Sealer (Recommended)
- Set the sealer to the appropriate temperature based on the thickness of your bag (typically 375°F to 400°F for standard Mylar).
- Place the top of the bag between the sealing arms.
- Press down and hold for 3–5 seconds.
- Release and let the seal cool.
Option B: Use a Household Iron
- Set the iron to “cotton” or high heat with no steam.
- Lay the Mylar bag on a flat, heat-safe surface.
- Place a wooden board under the seal line for support.
- Press the iron across the top of the bag for 5–10 seconds, ensuring a consistent, firm seal.
Tip: If you’re sealing a large 5-gallon bag, you can partially seal it first, check the oxygen absorber placement, and then finish the seal after removing more air.
Step 6: Check the Seal
Once the bag cools, gently press on it to ensure there are no leaks. A properly sealed Mylar bag should feel firm, and the seal line should look smooth and even. If in doubt, re-seal the top one more time.
Storing Your Sealed Mylar Bags
After sealing, label the bag with the contents and the date. Store your bags in a cool, dark place—preferably in a food-grade bucket for added protection from rodents or punctures.
Common Mistakes to Avoid
- Sealing too early: Always add the oxygen absorbers just before sealing, not too early.
- Too much food: Overfilling can prevent the bag from sealing completely.
- Low heat: If the seal peels open easily, your iron or heat sealer may not be hot enough.
- No oxygen absorber: Even if you seal the bag, skipping the oxygen absorber can reduce shelf life significantly.
Final Thoughts
So, how to seal a mylar bag correctly? It comes down to a few simple tools and a little attention to detail. Whether you’re preparing for emergencies or just trying to stretch your grocery budget by buying in bulk, knowing how to seal mylar bag is a skill that pays off in the long run.
If you ever find yourself wondering, “How do you seal a mylar bag without fancy tools?”—remember that even a household iron can do the job effectively. The key is creating an airtight barrier to protect your goods from oxygen, moisture, and light.
Now that you’ve learned how to do it, go ahead and give it a try. With the right preparation, Mylar bags can be one of the most reliable and affordable ways to preserve what matters.